FOREWORD
The following project has been done as a part of my M.Tech research work (Human Detection and Tracking with SLAM through a Mobile Armed Robot) under the guidance of Mr. A.P. Sudheer (Mechatronics/Robotics Lab In-charge, National Institute of Technology Calicut) and Dr. M.D. Narayanan (Mechanical Engineering Department, National Institute of Technology Calicut). For any queries regarding Kinect Sentry Gun you may contact me at hashim_kahily@live.in.
Have you ever thought of safe guarding your backyard from intruders? Making any place into a no man’s land? Well, congrats! You’ve stumbled upon the right website that describes in detail how to make your own autonomous security system.
This system detects only humans unlike other open source sentry gun systems which are based on motion detection. The advantage this system holds is that no innocent bird or any animal (maybe your pet) in the scene would get hurt.

My Kinect Sentry Gun
Application
- Scenario paintball/airsoft games
- Military/Law enforcement training
- Any other non-lethal area defense
The following two videos shows the working of my autonomous system (Kinect Sentry Gun). The fantastic characteristic of the Kinect sensor used for human detection in this project presents the benefit to implement these operations discreetly in pitch darkness as well!
Please read the disclaimer before proceeding to the explanations. The disclaimer has been provided with the intention to protect myself from the lawsuits your nearest relative would thrust upon me after you kill or injure yourself over trying this project.
Disclaimer:
- I the author of the content contained within can assure you, that any of the opinions expressed here are my own and are a result of the way in which my mind interprets a particular situation and or concept.
- I would also like to impress upon the fact that I the owner of this site cannot be held responsible for creating disharmony in the society should the website’s matter get coupled with any dysfunctional, sinister mind.
- Should you identify any such content that is harmful, malicious, sensitive or unnecessary, I request that you contact me via email so I may rectify the problem. Failing that you may like to just sit and weep incessantly!
The underlying explanations are categorized into sections and subsections to aid the simplification task.
EXPLANATIONS
- Prerequisites and Software Installation Guide
- Making the Physical Robot
- Human Detection Code
- Communicating with the Micro-controller
- Teaching the Robot through Regression Analysis
- Getting the Results
1. Prerequisites and Software Installation Guide:
A number of hardware and software tools are required as prior conditions to get the system working. To make your own autonomous system which autonomously detects and tracks humans, you are required to have:
- a Windows XP or later computer/laptop
- a Microsoft Kinect Sensor. The Kinect, was launched on November 4, 2010 and sold an impressive 8 million units in the first 60 days, entering the Guinness World Records as the “fastest selling consumer electronics device in history.” It enables users to control the game with physical gestures and voice-based command. It has not just used in the gaming system but has been implemented in various applications like unmanned aerial vehicle (UAV), human recognition, 3D model re- construction, ground mobile robot navigation and medical applications.
- a basic working knowledge of Arduino Microcontroller Platform and its drivers installed in Windows. Arduino is an electronics prototyping platform with a series of microcontroller boards and the software to program them. You can learn more online at www.arduino.cc and in the excellent book Getting Started with Arduino by Massimo Banzi. This guide provides step by step method to install and run Arduino programs in Windows.
- a basic understanding of Processing Software. Processing is the multimedia programming environment used in this project. It’s based on Java, and made for designers, artists, and others who don’t need to know all the gory details of programming, but want to get something done. It’s a useful tool for explaining programming ideas because it takes relatively little Processing code to make big things happen. It’s a free, open source tool available from www.processing.org. I highly recommend you to refer this book to get familiar with the Processing language.
- SimpleOpenNI library and Kinect drivers installed in your Windows. The SimpleOpenNI library provides access to all of the data from the Kinect that we’ll need. Installing SimpleOpenNI happens in two phases. First, you install OpenNI itself, this is the software system provided by PrimeSense that communicates with the Kinect to access and process its data. After you’ve got OpenNI successfully installed, the final step is to install the SimpleOpenNI Processing library itself. Installing OpenNI requires a number of pieces of supporting software that all have to be installed for things to work. Thankfully, a company called ZigFu provides a one-click installer that puts all the pieces in place in one shot. You can download the ZigFu installer for Windows from http://zigfu.com/en/downloads/browserplugin/. Select the Zigfu Dev Bundle (not the one labeled “for Mac”). This will provide an .exe file you can double-click that should install everything. Having done that, you need to install Kinect drivers for Windows from this link.
- a suitable robot (A detailed explanation has been described in the following section).
2. The Physical Robot:
One of the basic requirement for a sentry robot is the availability of a 2DOF pan and tilt turret mechanism. “Pan” is turret’s left and right movement (X Axis) and “tilt” is the Y axis (up and down) movement. You will require a couple of servo motors to control these movements for the aiming purpose. The following pictures shows the 2DOF turret mechanism of my robot. I’ve also included pictures of the CAD model for better understanding.

My physical robot
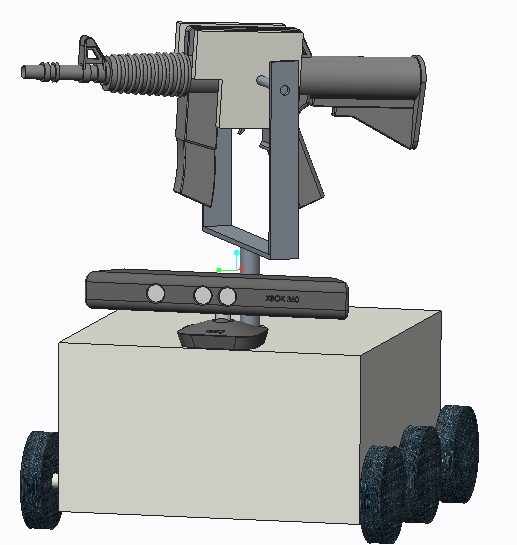
The CAD model

Servo positions for pan and tilt motions
The servos you use need to have 180° of travel for the X axis (pan motion) but 90° is fine for the Y axis (tilt motion). There should also be a laser mounted on the robot which is helpful to indicate where the gun is aiming.
3. Human Detection:
Detecting humans is one of the primary feature of the concerned autonomous system. Once you have Processing wrapped with SimpleOpenNI library setup and running in your system, you can paste the following code in your Processing window and click on run. Make sure that the Kinect sensor is plugged in to your computer before you attempt to run the code.
human_detection.pde Visit https://github.com/hashimK/KinectSentryGun to obtain the code
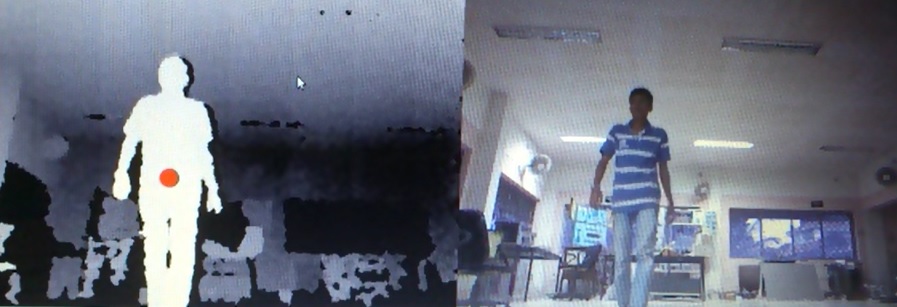
Snapshot of the human detection operation
OpenNI reports the center of a user’s body (x, y, and z), known as Center of Mass (CoM). As soon as a user is detected within the scene, a center-of-mass vector will become available. The figure shows the detection of the user that is visible in the scene, and displays a circle over the location OpenNI has determined the user’s center of mass. As discussed above, each center of mass vector includes a z-coordinate that will position it inside the user’s body. This information is discarded by converting our center of mass vectors into image (projective) coordinates. To achieve this, the real-world coordinates given to us by OpenNI is translated into projective coordinates that match the two dimensional depth image.
4. Serial Communication:
At this point of time you may be thinking, ‘I wonder if there’s a way to get human detection code and the servo motors to communicate to each other?’. Well, guess what – there is! – and this section is going to show you a brief example of Arduino-Processing communication.
In this example we will track the mouse position in Processing and use those numbers as commands to the servo motors. Horizontal motion of the mouse will move the turret in the pan direction and vertical movement of the mouse will impart tilt motion to the turret. Also, our Processing code prints the instantaneous pan and tilt servo motor angles if a mouse button is pressed. To accomplish the above tasks, we need to map the width and height of the Display window into pan and tilt angles of the servo motor respectively. The following figures shows the result of the above example. The red target shows the position of the mouse in the Processing window.
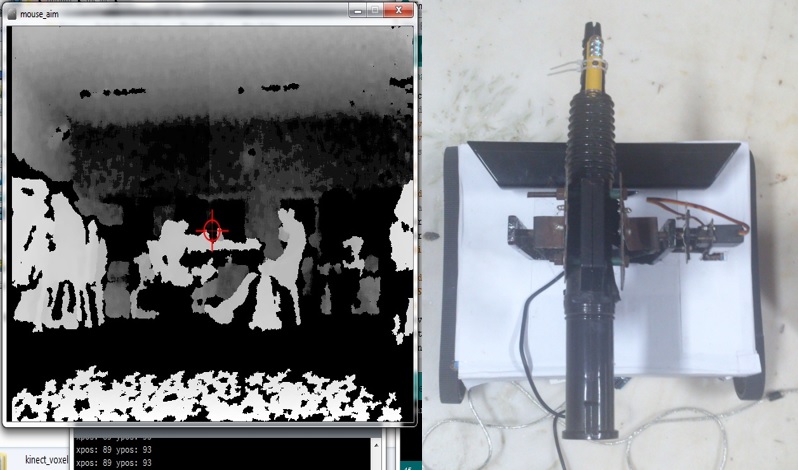
Snapshot of the gun position w.r.t the mouse
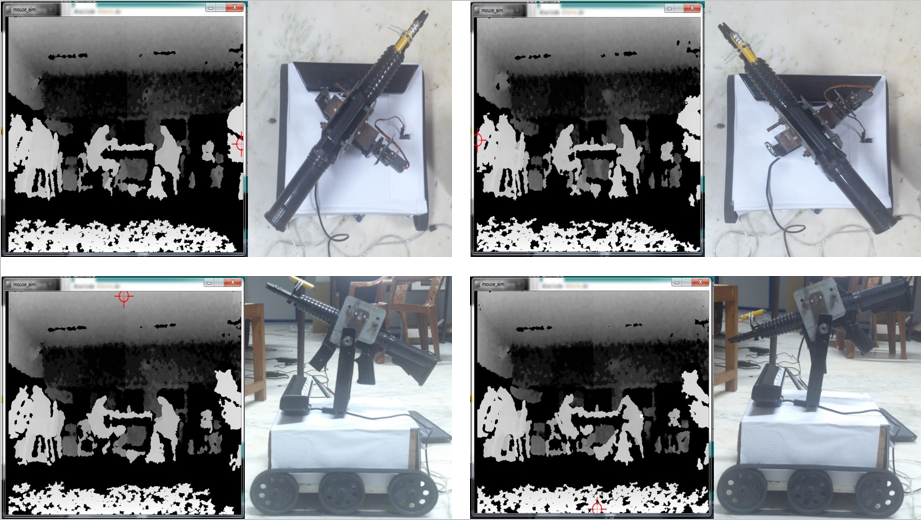
Different gun positions w.r.t to the mouse location
The following Arduino code is used to control the servo motors. Upload the code to your Arduino before running the subsequent processing code.
arduino_control.ino Visit https://github.com/hashimK/KinectSentryGun to obtain the code
Following is the Processing code which fulfills the serial communication and the above mentioned task.
mouse_aim.pde Visit https://github.com/hashimK/KinectSentryGun to obtain the code
5. Teaching the Robot through Regression Analysis:
Autonomous working is the fundamental essence of this project. For that, we need to teach the robot where to aim as soon as a human is detected. After achieving the CoM in projective coordinates we calibrate the gun angles with the pixel coordinates of the CoM. To do this, a toy laser is mounted on our gun, which helps us to check where the gun is aiming. The gun is manually maneuvered over the center of mass of the human and the pan and tilt angles of gun is noted along with the pixel coordinates of CoM in the depth image.
The following Processing code is used for the teaching purpose. It detects humans and controls the gun motion with the help of the mouse as explained in the previous section. Moreover, it prints the CoM of the detected human in pixel coordinates and instantaneous gun angles on left and right click of the mouse respectively.
aim_calibration.pde Visit https://github.com/hashimK/KinectSentryGun to obtain the code
Once you run the code, hover your mouse such that the laser is pointing on the human’s stomach. At this instant, click the left and right button of the mouse simultaneously to obtain a reading. Likewise, take more than 30 readings at different positions for successful calibration. Copy these values in Microsoft Excel to carry out regression analysis. You may refer this link to know more about how to perform regression analysis in Microsoft Excel.
The following figures shows my measurements in Excel and graphs between the gun angles and the CoM position in pixel coordinates.

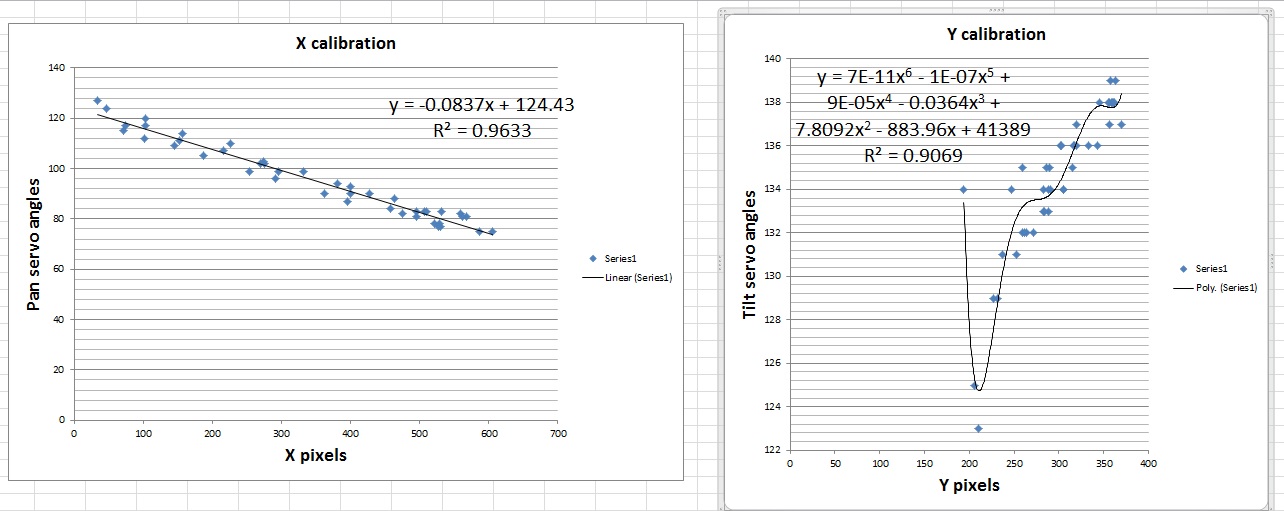
Regression analysis is done in both the graphs to obtain the relationship between the gun angles and the pixel coordinates of the CoM. The equations obtained are as follows:
Pan angle = −0.0837x + 124.43
Tilt angle = 7.8092y^2 − 883.96y + 41389
Having done that, the equations will determine the pan and tilt angles of the gun in radians for any value of x and y coordinates of the CoM. The following video shows my calibration operation.
6. Getting the Results:
The obtained equations are then fed to the robot for accurate, autonomous aiming. The following Processing code is the ultimate code you need to run for the autonomous aiming purpose. You will need to replace my calibration equation (blue colored in the code) with your obtained equation, since your servo and camera arrangements would be probably unique.
kinect_aim.pde Visit https://github.com/hashimK/KinectSentryGun to obtain the code
The following two videos shows the working of my autonomous system (Kinect Sentry Gun). The system will automatically detect, track and aim humans. It’s performance and accuracy is largely dependent on correct calibration and on how well the settings are adjusted.

great work! keep it up!
nice bro….Awesome!!
Great Work… Waiting to see more…
good work hashim